MacOS Client installation
Download the AB Tutor install pkg (ABTutorInstaller.pkg) from the Dashboard on your Central Server. This single installer file is used to install the specified components (Client and/or Console) and manages updates. The Client needs to be installed on any computer you wish to be able to control with AB Tutor.
Interactive install
To install AB Client using the installation wizard double click the ABTutor.msi installer. Continue twice to start the process.
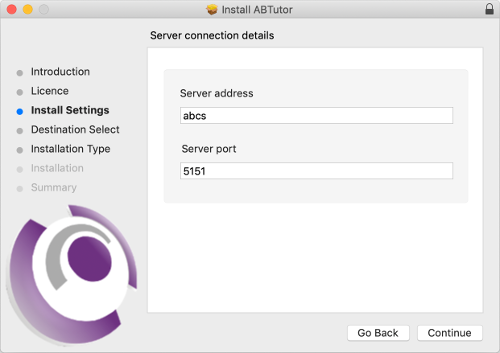
Read and accept the licence agreement, select to Install/Repair then enter the hostname and port of the Central Server. This will work with the IP address as well, but this will cause problems if the server's IP address changes in the future.

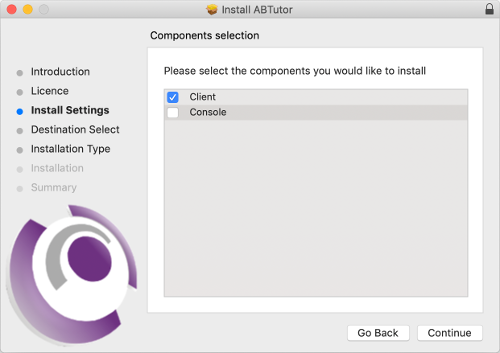
Now select which components you wish to install. If this computer is only going to be used by students, leave Console unselected, if it is to be used to control as well, select Console.

When you click Install the Maintainer will be installed. This will be very quick. Once this install is finished, the selected components will be automatically downloaded from the Central Server and installed. This could take a few minutes, especially if a lot of Clients are being installed at the same time.
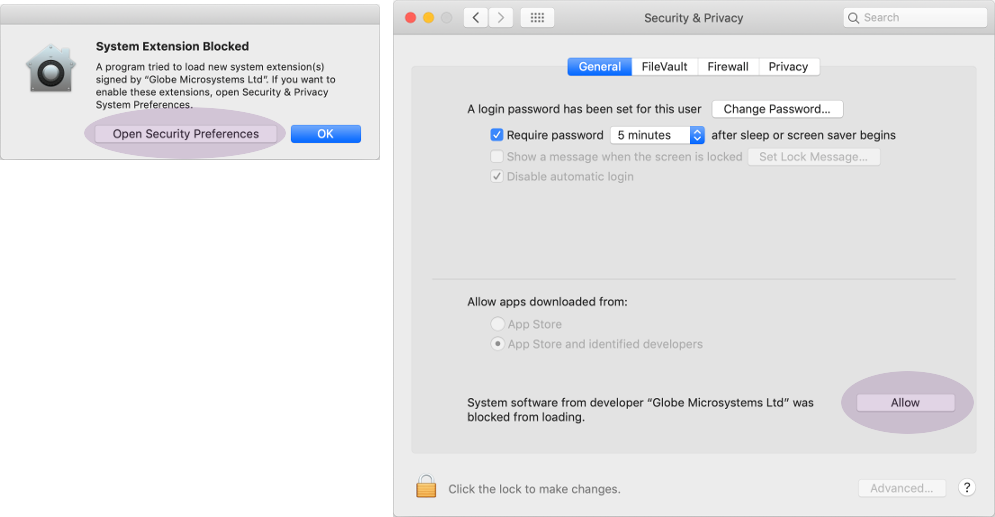
On newer releases of MacOS, you may need to grant the client permission to run as a system extension. This will be shown by the following pop up. Click Open Security Preferences and then Allow to authorise it.

After install, the client needs to be authorised on the Central Server. To do this, log in to the web interface and select Devices. This will show a list of unauthorised clients - you can click Accept next to a client to accept just that one, or Accept All to accept them all in one go.

Silent install
For large numbers of computers, a manual install as described above isn't practical. As AB Tutor is provided as a pkg file, it can be pushed out with a Mac Server. If you are just installing the Client and your DNS points abcs to your Central Server, you can just push the pkg out without any changes. If required, the command to install (as root) is:
installer -pkg ABTutorInstaller.pkg -target /
Once installation has finished, you can authorise the Clients on the server as described above.
If abcs is not set to point to the server, there are two ways to set the server hostname. You only need to do one of these:
Before install
Run the following command to set the server location:
defaults write /tmp/com.abtutor.installer.plist serverUrl "abcs"
where abcs is replaced with the address of the server. Similarly, the port can be set as follows:
defaults write /tmp/com.abtutor.installer.plist serverPort "5151"
Then run the installer as normal:
sudo installer -pkg ABTutorInstaller.pkg -target /
After install
If the server location needs to be changed after install, this can be done using the following command:
sudo defaults write /Library/Application\ Support/ABMaintainer/com.abtutor.permanentPreferences.plist serverURL "abcs"
again, with abcs replaced with the hostname of the Central Server. The port can be updated with:
sudo defaults write /Library/Application\ Support/ABMaintainer/com.abtutor.permanentPreferences.plist serverport "5151"
Once this is set, the settings will be applied after the next restart, or by running:
sudo killall ABMaintainer
Uninstall
The Client and Console can both be uninstalled by running the installer pkg again and selecting the uninstall option, or by running the following commands:
defaults write /tmp/com.abtutor.installer.plist action "purge"
sudo installer -pkg ABTutorInstaller.pkg -target /
Note that the uninstall will only work if you have not chosen the option to prevent the client program from being uninstalled via the Web Interface. For more information, see Additional Security.
Notes
 No icons are created if you just install the Client component as the Client is intended to be hidden.
