Creating Groups
Setup
 Console Configuration
The Console settings allow tweaks to be made to how the Console works. In the Console, select Tools - Settings to access the AB tutor configuration dialog box.
 Some settings options are only available to users who have the Console Admin role. Additionally, Admins will have multiple tabs allowing them to choose whether the settings they set are just for themself, a default that users can override, or an enforced setting.

For the overrides, there is an additional box to decide whether the chosen setting is enforced either on or off depending on how the right hand tickbox is set. Any options which a user can't override will be shown greyed out so they don't try to adjust them.
 General
The Settings menu allows you to customise how AB Tutor functions.

Block this Hostname from showing in the Clients List
This option will prevent the Console computer showing up in their own clients list, even if they are in the selected group. This is largely to prevent people from locking their own computer and then having trouble unlocking it again afterwards! Note that policies or actions applied to groups will still affect the Console computer, even if this option is ticked.
Add Client details to snapshots
If this option is selected, a small box with the Client hostname and currently logged in user will be added to snapshots taken, making it easier to tell where they came from after they are exported from the Log File Viewer.
Use AD Descriptions for Devices
This option allows the user to choose whether the device's AD description is shown instead of the hostname in the devices view. Either will be overridden by an alias.
Enable Group size indicators
This option shows how many devices/users are online in each group, out of the total number of members. Note that the number of sessions may exceed the number of items shown, for example if a user group has a user logged in on multiple client machines.

 Watch/Demo

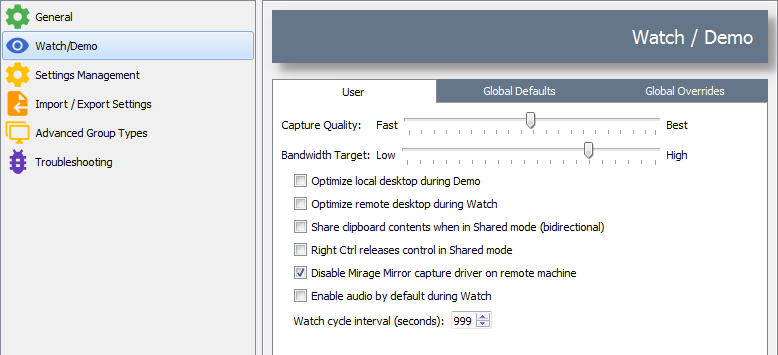
Capture Quality
This sets how much the screen data is compressed before sending over the network. Setting this towards the Fast end will reduce the bandwidth required, and hence speed up the screen refresh, but will reduce image quality. Setting it towards Best will increase the image quality at the expense of bandwidth. The optimum compression level depends on your network and computers, however we set this at half way as a default.
Bandwidth Target
This option will adjust the frame rate sent in order to use more or less bandwidth as set. Low frame rates could be more useful on a slow network where computers are being watched, rather than controlled. This, plus the Capture Quality can be adjusted independently to allow the best balance for a specific site to be found. This is also set at half way by default.
Optimize local desktop during Demo
If you enable this option then the desktop of your own computer will be modified for optimum screen transfer performance during a Demo session. Desktop optimization means that:
- Any desktop background pictures or patterns are removed.
- All menu display effects are removed (scrolling or fades etc.)
- All menu drop shadows are removed.
- All window title bar gradient fills are removed.
- Font smoothing is turned off.
- Tool-tip animations are removed.
- Smooth scrolling of list boxes is turned off.
- Window minimise/maximise animation effects are removed.
Optimize remote desktop during Watch
If you enable this option then the desktop of the remote client will be modified for optimum screen transfer performance during a Watch session.
 When this option is applied, the screen will flicker a few times as the changes are made. If you do not want the remote student to know they are being watched, then turn this option off.
Share clipboard contents when in Shared mode
This option allows clipboard sharing between the tutor and the client to be turned off. If turned on it is bidirectional, ie if a copy is done on either Client or Tutor, it will be sent to both computers' clipboards. Note that the contents of the clipboard will not be shared when you connect, only when a copy is done whilst connected.
Right Ctrl releases control in Shared mode
If this option is selected, when watching a computer you can use the right Ctrl key to release shared control of the client, allowing you to then use the left/right arrows to move to the next/previous Client.
Disable Mirage Mirror capture driver on remote machine
We provide an optional capture driver for use on Windows 7 machines which speeds up watch and demo sessions, however it can cause visible flicker as it optimised the display for transmission. If this happens, it allows the user of the Client machine to tell when they are being watched, which can be undesirable. Ticking this option will disable the mirror driver during a watch session.
Watch cycle interval
This option allows the cycle delay between clients (normal watch) or screens of clients (grid view) to be adjusted.
 Settings Management

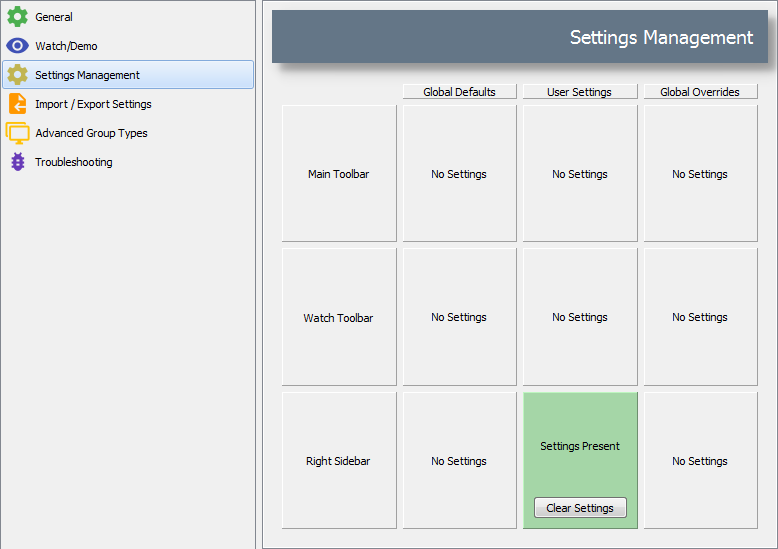
This section allows users to see what configuration has been set on the toolbars in AB Tutor - there are three levels of settings:
- Global Defaults
- are set by admins and will set how the software looks when a user first loads it.
- User Settings
- represent any changes to the interface made by the Console User. These will override Global Default settings if both are applied to the same area. These settings will only affect the current Console User - each user can have their own set of User Settings.
- Global Overrides
- are set by admins and will override both Global Defaults and User Settings. When these are set, customisation will be disabled for users. This allows a certain layout or set of action buttons to be enforced.
The settings currently in use will be shown in green here, any overridden settings will be shown in red. If there are no settings of a type, the box will be grey. Users can clear their own settings from here, admins can clear Defaults and Overrides as well as their own settings.
 Import/Export Settings

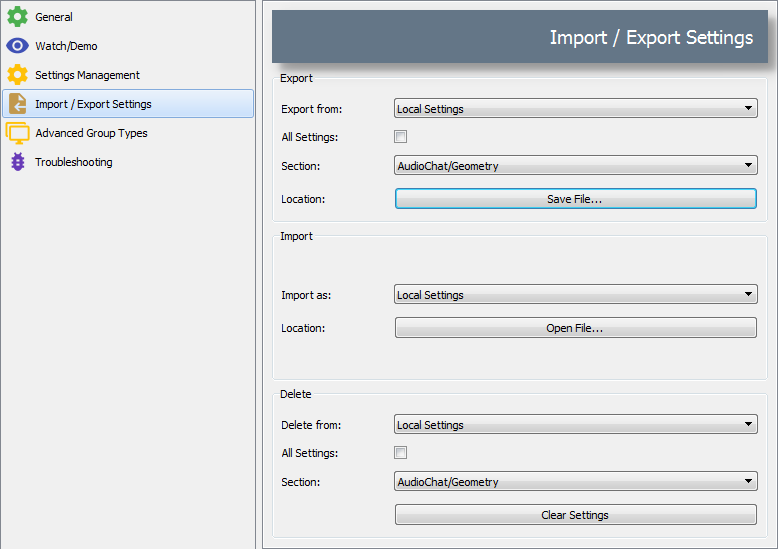
This section allows the user to save out any of the settings they have in the program, allowing them to keep them as a backup, give a copy to other users and later import them back into the software. The settings are split into four categories:
- Local Settings
- covers data saved to the local computer, rather than to the Central Server. This consists of computer specific settings such as window sizes and locations.
- User Settings
- cover histories (eg, launch menu history, saved lock messages) that are specific to the user.
- Global Defaults
- are similar, but are options that cover everyone rather than just the current user.
- Global Overrides
- include the same sort of settings which are enforced for everyone and can override User Settings. It also includes settings which can't be changed by users, such as Advanced Group types.
After selecting a category, you can either select All Settings to export everything in that category to one file, or pick out the one you want from the dropdown. Finally, click Save File.
Import settings is similar - you can select which category you want the settings to be saved into and then select the file you want to open.
Delete allows any unwanted settings to be removed easily, returning them to their defaults.
 Advanced Group Types

AB Tutor has some additional types of groups which may not be wanted in a normal setup. These can be selected from this menu. For more information on group types, please see Group Creation.
 Troubleshooting

From the Troubleshooting menu, you can clear the local cache on the Tutor. This is data from the server held locally to speed up loading the Console, however if any corruption happens in this data, it may need to be cleared.
Console shortcut switches
There are some additional advanced options for the Console startup which can be triggered through switches on the shortcut. To apply a switch: Right click on the shortcut on the desktop and add the switches to the end of the Target, eg:
"C:\Program Files (x86)\ABTutor\Console\Console.exe" -g group1
Switches include:
- -g groupname will start the Console with the group 'groupname' open. If run as a non-admin, the Console will be locked to this group.
- -s server will tell the Console to connect to the specified server name.
- -p port tells the Console to connect to the server on the specified port.
- --disable-cache starts the Console with caching disabled. This may improve performance in some cases but is intended for troubleshooting.
- --opengl enables the experimental OpenGL mode for drawing thumbnails. This should be faster.
